Lean mean carbon/kevlar/fiberglass version of AGVs AX8 Evo off road helmet – for people who growl while they’re riding.
Apparently, AGV had so many people asking for the AGV AX8 Evo Dual off road helmet without the peak, that they’ve decided to put this peakless version into production. Called the AX8 Evo Naked, it’s aimed at folks who ride naked bikes such as your factory streetfighters or supermotos who want a helmet with a distinctive and aggressive look but without the peak needed by off road riders. And pretty horny it looks too. It’s angular and mean-looking and the spec shows it should deliver the goods too.
AGV AX-8 Evo Naked in moody matt black
The shell comes in three sizes (a good thing) and by the looks of it AGV couldn’t quite decide what to construct it of so they made it out of everything they found in their lab. It’s got layers of Carbon, fiberglass and kevlar so you’d expect it to be pretty strong and shock absorbant. Other features: it’s got a double-d ring fastener, three front inlet vents and two exhausts, antifog and antiscratch visor and fully washable liners. It’s not been Snell or SHARP safety tested yet but it is, of course, DOT and ECE 22.05 certified and should retail for around $400 ($550 for the carbon version)/
If you’re looking to buy an AGV helmet, why not check out our other full AGV crash helmet reviews.
Note: Duchinni are not DOT certified for sale/use in the US mandatory helmet states.
Little known but becoming increasingly popular since the launch of their new range, this is the Duchinni D605 modular helmet.
First impressions are that it’s a nice and sleek-looking lid at a competitive price. It’s a flip-up modular helmet that’s operated with a single button at the front that’s easy to use. It has the usual three vents – a chin vent, forehead vents and rear exhaust vent – and has a fully removable lining. There might be some question marks over the ventilation not being quite strong enough to keep the shield fog free but a decent anti-fog liner should sort that out. Like many modular helmets, it’s a little on the weighty side (it’s got the weight of the mechanicals required to operate the movable front) so at 4.2lbs/1890g it might get a bit heavy after a while.
It was independently tested by the SHARP helmet safety labs in 2018 where it scored a relatively low 2 stars (out of a maximum 5) which would stop us recommending you buy a 605 – although it did score a decent 97% for the percentage of times during testing its chin guard stayed locked and closed. That’s a very decent score.
Just launched is the new AGV Numo EVO modular/flip up helmet. It’s aimed at the increasing number of folks who like the safety and utility of a full faced for when they’re steaming on a bit, but the freedom of an open faced helmet when the mood takes them or they’re in bimbling mood. In fact, this helmet’s been dual-homologated by the ECE dudes – meaning it’s been tested and approved to work in both guises – something that not all modular helmets have.
Hi Vis yellow version of the new AGV Numo EVO flip up helmet
As you can see, it looks pretty nice. So what features has it got?
It’s got a thermoplastic shell with the usual chin and forehead vents with a rear exhaust. The liner’s fully removable and washable and, in this case, built of breathable fabric with, say AGV, no seams at the point of contact with the head.
AGV Numo EVO in white showing sun visor.
The visor’s antifog coated and has an integral sun visor operated by a little lever to the left. It’s secured with a micrometric fastener (which are pretty good) and is SHARE bluetooth system enabled. Price will be around about $300 depending on color scheme. Go here for our full review of the Numo EVO.
We’ll check out the AGV Numo EVO in the fullness of time. Looks like it’s got decent features and the right price point though. In the meantime, if you’re interested in other flip-up helmets, check out our modular/flip up helmet page. Or check out all our other AGV crash helmet reviews.
The Nolan N86 is an update to the N85 helmet we previously reviewed. Like the N85, it’s a medium priced full face helmet with an integral sun visor, Pinlock anti-fog visor that scored a good four out of five in the SHARP crash helmet safety test.
Main Features
Note: the N64 is no longer produced. Take a look at our Top 10 Full Face Helmets page to find a quality alternative.
Scored 4 stars in the SHARP safety test
Comes with Pinlock anti fog insert
Integral sun visor with sunscreen
Polycarbonate shell
Weight 3.5lbs/1.6Kg (about average)
Prices range from $200-$270 depending on model/retailer
The Nolan N86 is a development from the popular and well-regarded N85. It features a polycarbonate shell, removable anti-bacterial liner, integral sun visor and Pinlock anti-fog insert. It’s a popular mid-priced helmet with a good safety rating. It’s about average for noise suppression and users reckon it’s pretty comfortable. All in all, a good value helmet that should serve you well.
Safety
As we usually do on Billyscrashhelmets, we assess helmet safety by using all the independent crash helmet testing data that’s available – including both Snell and SHARP crash helmet testing score, where available. Like the N85, the N86 hasn’t been Snell tested, but it did score a very respectable four stars (out of five) in the SHARP test, with the helmet dropping the last star for a moderate (amber) side impact score. This is pretty typical for a four star helmet where they’re designed to be most impact resistant at the front of the helmet. The N86 is of course DOT certified and passed the ECE 22.05 safety standard. Based on this data, we’d give the Nolan N86 a thumbs up for safety.
Wind Noise
Like most helmets, the amount of noise you’ll hear will depend on whether you’re used to riding with a helmet that’s particularly great at suppressing wind noise or not. It also depends on where your helmet is in the windflow (i.e. behind a helmet or not). That said, the Nolan N86 is widely reported by owners as pretty good in terms of noise levels. At any rate, you should always wear ear plugs if you’re travelling far, in which case wind noise should be kept to a minimum.
The Nolan N86 shell is polycarbonate and produced in one size only, which is not ideal. That usually means if you’re an XS or S size, it’ll look pretty big on you and they’ll make it fit by using extra padding inside. The converse is usually true for the larger sizes and you’ll get less padding. It’s not thought doing this appreciably affects the safety of the helmet, but isn’t ideal. More expensive helmets come in three helmet sizes.
Ventilation
Ventilation on the Nolan N86 is reported to be pretty good. It’s got the usual compliment of chin, forehead and rear exhaust vent and all work well, with their levers that open the vents being fairly solid and relatively easy to use with a gloved hand. The chin vent directs a good amount air across the back of the visor so, together with the Pinlock, you should be OK there. If you regularly ride somewhere hot it might not be the coolest full face around, but should perform pretty well. If cooling’s what you’re particularly after, check out our Good Ventilation page for a range of helmets that excel here.
Shows the N86 rear exhaust vent and top vents
Shield
The shield on the N86 is sound. It seats firmly against the rubber gasket and there haven’t been any reports of rain entering. While not massive, the aperture is adequate, giving a decent view of the road with enough peripheral vision. The shield itself has a central tab which is good, making it very easy to find and open the shield, and the shield ratchet has five positions, including a first ‘cracked’ position for demisting. All of which is good.
The N86 has also got an integral sunscreen sun visor, meaning there’s a separate, secondary visor sitting behind the main shield that can be lowered to cut out the sun. It’s also anti-scratch and treated with anti fog. It’s operated by a lever on the left of the helmet and works really well. Especially nice is the ability to lower it partially rather than fully down or up, putting control right where it’s needed – in your hands.
Like many other Nolans, the shield is really simple to remove – great for if you want to take it off and clean it thoroughly. Nolan use a press button on each side of the helmet that you press and pull the shield out. Couldn’t be easier. Nolan users report they’re particularly happy with how easy this is. A final great feature is that the N86 comes with a Pinlock anti-fog insert. If you’re unsure what they are and how useful you’ll find one, click the link. But trust us, anti-fogs are pretty essential to stop shield misting – especially in the cold and/or wet!
Comfort
The Nolan comes with fully removable liner that’s antibacterial treated. It snaps in and out pretty easily and is comfortable. Overall, the N86 is regarded as pretty comfortable, even on long journeys, by owners. The helmet is designed to be particularly streamlined with what Nolan call a compact design to reduce buffeting. Not sure it’s particularly worked but folks don’t seem to be complaining about helmet buffeting so it’s probably OK on that front. Most tend to regard the N86 as a comfortable helmet so provided you’ve followed the usual fitting rules so you don’t have pressure points, you should be happy.
Other stuff
If you like your bluetooth intercoms, then you’ll probably be happy with the N86. These days, Nolans come N-com bluetooth intercom ready. There’s a little flap on the side that will hold the intercom CPU with a recess inside for the microphone and speakers with a pop out section in the padding at the bottom to allow clear cable routing, so it’s all integrated very nicely. The N86 is fastened by a micrometric fastener which are very easy to operate, though if you’re planning on visiting a circuit, helmets are not generally allowed for track use unless they’ve a double D-ring fastener.
In Burn Out color scheme
Overall
The Nolan N86 is a good all round performer. It’s comfortable, has some useful features like the sun visor, anti-fog insert and integrated intercom; and it performed well in the SHARP safety test. Users like it and reckon it’s good value for money – and so do we. To see prices for the Nolan N86, click the graphic below. Or use the feature cloud to the right to sort helmet reviews by the feature you’re particularly interested in.
If you’ve ever owned a Nolan N86 helmet, we’d love to hear what you thought about it – please let us know in the Comments area below. For other motorcycle crash helmet reviews, visit our All Crash Helmets Reviews section or our Only SHARP 4 or 5 Star Helmet Reviews section.
Arai is pretty universally recognised as one of the best helmet manufacturers. Best in terms of producing crash helmets of the highest quality and inspiring a high degree of customer loyalty from their users. So I did a bit of digging to find out some more about their helmets and uncovered a few fascinating facts:
1. Each Arai helmet is hand built and is signed by one of the workers on the inside of the shell (unless you’re willing to rip your helmet apart, I guess we’ll have to take their word for it on that one!).
2. Over half the drivers on the Formula One grid wear Arai crash helmets (even though most don’t carry their logo because of sponsorship).
3. And while many MotoGP riders use Arai helmets too, they only use stock helmets because Arai don’t make any custom built helmets. If it’s on the track, it’s a standard helmet you can buy off the shelf! Pretty impressive pedigree.
4. Arai was the first to give a 5 year warranty with their helmets.
5. Because we all have different shaped heads, Arai make different helmets for Europe, US & Japanese-shaped heads.
6. And lastly, Arai have been voted No.1 Crash Helmet in the JD Power surveys for the last 13 years (voted by customers) which is a pretty good recommendation in anyone’s book
Arais (like Shoei) aren’t designed to be the cheapest on the market. They’re a premium brand designed to last and provide excellent performance (comfort, safety and practicality). And given the level of customer recommendations, I think it’s safe to say they’re doing a pretty good job.
Note: the Caberg Duke is not DOT certified for sale/use in the US.
Summary
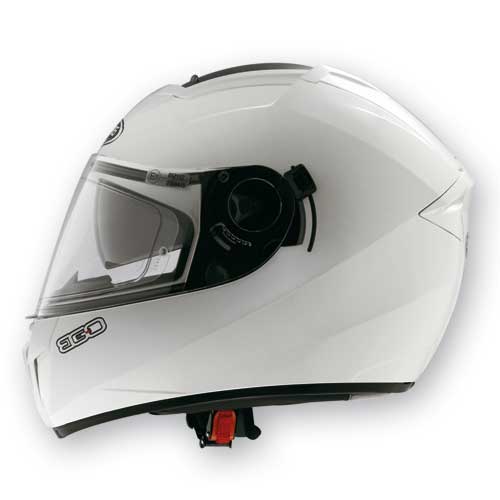
Caberg are a pretty well known Italian crash helmet manufacturer, producing mid-to-lower priced helmets. Here’s some more background on Caberg. The Caberg Ego is a nicely designed helmet with some great features. Although not independently tested for safety (so we can’t wholeheartedly recommend it), Caberg did come out in second place in our review of the safest helmets, so we’d expect it to score well. It includes great ventilation, an integral sun visor and is comfortable to wear. For the price, it’s great value for money and should give good service.
Note: the Caberg Ego is no longer available. For some great alternative helmets, check out our top ten helmets list.
Weighs 3.5lbs/1.6 Kg (about average for a full faced helmet)
Thermoplastic Polycarbonate shell
Integral sun visor
Huge top ventilation panel
Available in sizes XS to XXL
Comes with a Pinlock anti-fog insert
Price range: approx $150 depending on design
Safety
The Ego hasn’t been SHARP or Snell tested yet, but other Cabergs which have been tested generally perform very well (7/10 receiving the full 5 star rating for safety). It’s impossible to see how well the Ego will perform of course but based on previous performance, it could be OK. Having said that, it’s a little worry having such a large gaping hole in the top of the helmet which surely must be in danger of weakening the structure of the helmet in an accident? I guess we won’t know until SHARP or Snell get their hands on it.
Caberg Ego in Metal White
Noise
Most riders seem to rate the Ego as OK for noise suppression. Some noise does get in through the vent on the crown when it’s open and, like most full face helmets, some gets in through the bottom of the helmet. However, it’s not too invasive and the Ego’s about average for noise.
Size
The Caberg Ego is available in sizes XS to XXL but I couldn’t find any specific figures for how many shell sizes Caberg produce for the Ego. Higher quality brands produce their helmets in multiple sizes; if you produce one helmet shell only, you have to adjust the fit by adding more or less polystyrene inner lining. This might, arguably, reduce the effectiveness of the shock absorption of the helmet in an accident and it can also lead to the helmet looking slightly weird when you’re wearing it; if it’s too large you can look like a lollipop. It’s possible the Caberg Ego is produced in Large shell size only so if you’re an XS you might want to check one out in a shop first to make sure you don’t look a bit silly if you get one!
Ventilation
Ventilation is one area that Caberg designed the Ego to excel in. It’s got the usual chin, crown and rear exhaust vents, but it’s the crown vent that attracts all the attention. It’s basically a mini sunroof with a plastic panel that slides back, front to rear, to reveal a large panel that lets air vent straight onto the top of the head (Caberg call it CASC). There’s a stainless steel grille stopping anything dropping into the helmet when the panel’s open. This top vent does a great job in letting in the breeze and channeling it around the top of the head and out of the rear exhaust. Good if you live somewhere hot and useful in that it helps general air circulation around the head and drawing air over the shield. If it starts raining, the cover is pretty easy to slide back into place and the seal’s a good fit. Folks report it is watertight, so Caberg have done a good job there.
Caberg Ego Elite helmet showing top vent fully open
The other vents are adequate, with the chin vent being operated by a little pad under the chin guard. A reasonable amount of breeze comes in through the chin vent and, coupled with the Pinlock anti-fog shield insert, keeps the shield nice and fog-free in colder weather.
Shield
The Caberg shield is sound on all levels. It’s got a main clear shield and an integral sun visor operated by a lever on the left hand side. The main shield operates easily, has 5 positions – including a first demist ‘slightly cracked open’ setting – and has a good, positive feel to it. The shield removal mechanism is incredibly easy to use – something that can be important if you use the helmet a good deal as it means you can quickly remove the shield after each trip to clean it. To remove it, push the sliders on each side of the helmet and the shield pops out. Sweet. It also comes with a Pinlock anti-mist insert which is one of the best anti-fog systems you can get. The insert slots onto the pegs on the inside of the shield and that holds it in place.
Showing integral sun visor
Comfort
Users say the Caberg is comfortable with a good quality, removable lining that’s hypo-allergenic and sanitized (according to their blurb). Obviously, a helmet’s only comfortable if you get the fit right in the first place – check out our crash helmet fitting guide. The lining is removable and washable.
Other
Other stuff of note is the fastener which is a micrometric fastener – a type that’s really easy to use and becoming more and more popular. It’s available in 8 color schemes, with the full details of each available here.
If there’s a feature you particularly like, click on the name of the feature in the tag cloud on the right hand side to see which other helmets have it too. If not, and you’ve read enough, feel free to click the graphic below to visit a retailer you can price check the helmets at. Thanks for dropping by!
Bit of fun this. BMW S1000RR trying the oldest trick in the book. Can it swipe away the tablecloth leaving a full banquet of assorted cutlery, tureens and whatnot in place? Have a look and see…
The Roof Desmo is a very clever helmet that looks pretty cool and imposing too. It’s well finished and feels good quality. The chin guard can be moved from full to open-faced positions and back with just one hand. It’s slightly below average for noise suppression, pretty aerodynamic and very easy to get along with day to day.
It’s not been Snell tested (they don’t seem to do modulars) but the ECE version of the Desmo has been SHARP 4 star safety rated (chin bar 97%) which means it should offer excellent protection too. However, apart from the fact that Roof dealers seem to be few and far between it’s a good performing modular helmet that’s well worth a look.
Typical price range: $350-$450 depending on model/retailer
Roof Desmo with chin guard down and shield closed. Looks pretty mean huh?
Safety
The Desmo is only ECE 22.05 approved so it’s not DOT which means it’s not legal to use in mandtory helmet states. As of July 21, it has been independently SHARP safety tested in the UK where it scored an excellent four star rating (out of five).
8.5 m/s test results for the Roof Desmo – courtesy of sharp.dft.gov.uk
It’s also dual-homologated – meaning that it’s been ECE approved as both an open faced and full faced helmet. So if you have an accident with the chin bar up it should still give excellent protection – as long as you don’t face plant as that won’t end up so well!
If you do ride with the chin bar down, it should give great face protection too. SHARP tests the percentage of time that the chin bar stays locked and closed during their impact testing, and in the case of the Roof Desmo, that was 97% of the time which is very good – it came unlocked just once during their testing by my calculations.
Noise
It’s not massively noisy for a flip-up helmet, but it’s not massively quiet too. If you’re used to a full face helmet, you’ll probably find it a bit noisy. It’s OK if you use ear plugs of course, and, as always, it depends on what sort of bike you’re riding and whether the wind is routed at or over the helmet. In general though, I’d say it’s probably about average among modular helmets for noise suppression.
Some folks reckon that Roof helmets are a little short, front to back. With the Desmo’s chin guard down, I find my chin presses against the inside of the guard a little, so that’s probably true. However I find it comfortable and it helps keep the helmet positioned correctly whereas some other helmets slip around a little when your speed goes up. While the interior is fully removable and washable, Roof also provide the cheek guards in different sizes to help you get just the right fitment. Size Large was about bang on for me and about the same size as my regular Shoei.
Ventilation
One of the main downsides for the Roof Boxer was the lack of ventilation. So Roof have made a particular effort to improve it with the Desmo. It’s got a double vent in the chin guard, a vent at the top of the helmet and another exhaust vent to the rear. The front chin vent is really effective. It’s a little fiddly to operate – there’s two small tabs inside the vent and you push one up and the other down to open the vent. Once open, the airflow is directly into your mouth. The top vent is spring-loaded. You push down on the two little panels to open the vent; and to close it, you push back on a tab behind them and the vent panels pop back into place to seal the vent. That works OK. The vent at the back is sealable too but probably not something you’d change when riding along as it’ll be too awkward. Overall though, the ventilation is great – good enough to keep things mist-free in the winter and cool in the summer. Bang on.
Shield & chin guard
Chin guard swivels to the rear out of the way.
The shield mechanism on the Desmo is ace. The shield itself is a big old bendy thing in the style of a helicopter pilot’s, but despite this, it’s optically pretty good. It’s also anti-scratch (obviously) and has an anti-fog coating. When the chin bar is down and in position, the shield sits snugly in a rubber gasket, sealing things tight and keeping water out. There’s a tab at the top of the shield that you push up to open the shield (I found this a little odd at first but got used to it pretty quickly). The shield doesn’t have any ratchets, instead it slides up smoothly and stops in place wherever you put it. With the chin bar backwards and using the helmet as an open face, the shield pulls down to act as an eye-shield. If you’ve got a rather large snout, like me, then having the shield fully down can push up on your nose and squash it a little against the inside of the shield! However, I find that if I don’t pull it down fully, it’s still effective and leaves my honker to stick out in the small v at the bottom of the visor.
Worth mentioning is the really clever ‘desmodronic’ visor mechanism that moves the shield out of the way of the chin guard when you push it back round the back of your head and brings it forward again when you pull it down. It’s really nicely done and works well.
Comfort
So far so good. I’m usually a 60cm Large and that’s what I bought the Desmo in. It’s a totally perfect fit and very comfortable with no pressure spots for me. The inner fabric is good quality and fully removable. As mentioned before, the shield can press against larger noses and the chin guard can press against the chin. So it’s fair to say if you’re over-endowed in either the nose or chin department, it’s probably worth trying before you buy.
Other stuff
The Roof Desmo has a micrometric fastener which is still relatively unusual but works well. Push a plastic ratchet-strip into its retainer and it clicks firmly into place. To release, you just pull a material tab and the ratchet releases and the chinstrap opens. It’s very simple to operate and works well. The chin guard mechanism seems pretty durable and it looks like some solid metal bits and bobs are used so hopefully it’ll be solid.
However, it does rely on friction to keep the shield open and that means parts rubbing against each other; meaning I’d expect some wear and tear to take place.
Roof does include a spare set of nylon fitments though together with a key-fob hex key that fits the nuts on each side of the helmet, so that’s a welcome inclusion. There’s also a pretty nifty helmet bag in the box too. To see the full range of paint jobs Roof Desmo helmets follow this link.
For other helmet reviews check out either our Crash Helmet Reviews or SHARP 4 & 5 Star Crash Helmet reviews sections! And if you‘ve got a Roof Helmet – including the Desmo – we’d love you to let us know what you think. Please comment below – thanks!
Slightly Dodgy Roof Desmo Video
But it gives you a good idea of what the Desmo’s like and how the shield works
For some strangely juvenile reason, I always love bikes v cars competitions. Here’s the latest one I came across with a Panigale S v a McLaren 12C on track…
I’d been looking for a pair of heated and waterproof gloves for a good while now – checking out the different brands like Gerbing, Bike Tec and Keis. But I finally plumped for a pair of Gerbing G3 heated gloves. Why? Probably a combination of sampling a pair at a motorcycle show and the limited lifetime guarantee they come with that swung it.
Anyhow, I bought the G3s online and was inappropriately excited to give them a go. Thirty odd years of freezing one’s nuts off on the bike in winter does that to you I guess.
Gerbing’s G3 heated gloves
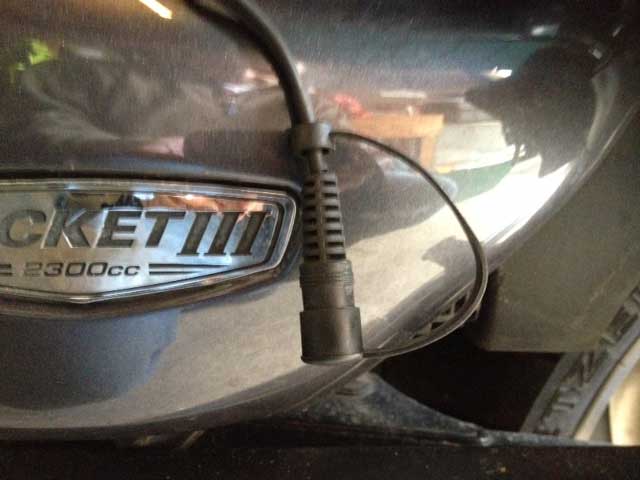
It’s pretty painless attaching them to the bike – just connect the leads to the battery terminals and try and find a reasonably clear route for the cable to poke out the side of the bike. Both terminals join together to form one wire with a weather protective rubber cap on it and have an inline fuse to protect the gloves from over charging. All you need to do is have it so it exits somewhere reasonably handy and near where you sit so you can plug the controller cable into it. With mine, it sort of tucks away near the left hand side panel when not in use, but I can fish around for a second or two and usually find it without much of a problem.
Power connector sticking out of the bike
So that’s the connection to the bike done. Next you have a really long cable that connects to both gloves with a controller unit you use to turn up the temp on the gloves. From the bottom of the controller comes a single cable that plugs into the bike socket.
If you’re using the gloves alone (i.e. without their heated jacket), it’s all a bit unwieldy. The cables have to be long as they have to stretch from the battery to the end of the bars, and they’re designed to be routed through your jacket sleeves and out your arm holes. But it’s all a bit fiddly. No problem if you have a heated jacket too as it’s the jacket that plugs into the bike and the gloves just plug into sockets on the end of the arms, but used without the jacket, it’s a bit of a pain putting the jacket on and pulling the cables through then having the wiring and controller dangling around while you try and get your kit on. It’s not insurmountable in the scheme of things but in the middle of winter when you’ll be using the gloves, it’s just another inconvenience you can probably do without.
So, your clobbers on. Your cables are routed through your jacket. You clamber on the bike, plug the controller cable into the socket on the bike. You plug the gloves into their sockets, pull the gloves on then make sure the controller is sat snugly between your legs, and we’re ready to rock. Fire up the bike.
Digital power connector
Next step is to set the temp on the gloves. On the G3s that’s done using the controller on the cable. Since we’re using the gloves on their own, that means you have to locate the controller and look down to use it – which can be really rather dangerous on the move so best to get it done when stationary. Which is easier said than done because it’s not until you’re on the move that you really know what settings you need. However, it’s got one big button in the middle that you press to increase the heat – so nice and simple. One press, a green light flashes and it seems to do bugger all. Two presses and you get a solid green light and it’s enough to keep the chill off. Three presses and you get a weird probably-amber-but-might-be-red-light that usually needs a second glance to check – again, not good on the move. Then a fourth press is max heat. Press it again, and it turns off, and more presses cycle back round through the heat levels. All nice and simple.
So that’s sorted. We’ve chosen the temp we reckon will be OK and we’re off. But as I said, it’s really difficult to choose the right temp at the get-go so you usually end up fiddling along the way, which ain’t exactly safe. So Choose Your Moment Carefully.
And there I was on my first ride, palpably thrilled to be experiencing, for the first time in 30 years on the road, warm hands in winter. How exciting. My expectations? Somewhere between toasting my hands in front of an open fire and plunging them into a barrel of freshly warmed kittens wrapped in cotton wool. The reality is a little different.
On green (heat level 2) there was enough heat to keep the chill off. You can sense a little heat at the fingertips which is good but overall you’re left wondering if they’re actually working because all it feels like is normal gloves on a moderately cool day. Which is fine, because you can check this by turning the gloves off. This leaves you in no doubt it’s a bit freezing outside and without them you’ll have a fist full of frozen sausages in no time.
But it wasn’t exactly the toasty barrel of kittens I’d been hoping for. So, I up the heat level to weird amber level 3. And that’s better. I can really feel heat at the end of the gloves now and that’s niiiiice. But I’m noticing now that there’s no heat along the palms. I didn’t notice that in the sales bumf – although come to think of it the www.gerbing.com website’s got about as much tangible and practical information as a copy of Watchtower (hadn’t uncovered the useful www.gerbing.eu site at that stage). Ditto for the instructions which come with the gloves.
After a while I reasoned that they didn’t put heating elements in the palms because you’re gripping tightly there and that might cause too much heat coming into your hands and/or lead to the elements breaking pretty quickly. All of which was fine until I also noticed that the back of my right hand had a distinct sensation of burning. Not my left – that was OK. Just my right. Uncomfortable levels of heat/pain that I could tolerate for a few minutes but after that, had to adjust it. So the remainder of that trip was spend fiddling with the controller flipping between green and weird-amber trying to find the delicate balance between not freezing both hands and not carbonising my right hand.
All of which brings me on to my next trip out. Over my local hills, mid-winter, temp hovering just above freezing. Gloves hovering between green and weird-amber – before the heavens opened. Proper biblical levels of rain. But I was fine. I’d got my waterproofs on and military goretex boots – and swish new electric Gerbing gloves. What could possibly go wrong?
Well all was fine at first. The rain cooled the gloves down so they were pretty OK on weird-amber setting and I had a little trill of happiness that here I was in mid-winter in a monsoon and my hands were still warm. Only, 5 minutes later and everything suddenly went cold. I glanced down at the controller and there was a light on it but it was flashing blue! WTF. Dismay. Alarm. Disappointment. Cold.
Just when I thought things were going OK and I’d adjusted my expectations away from barrels of warmed kittens and toasty fires, and was reasonably (if slightly grumbly) accepting that hovering between tepid and a burning right hand was as good as it was going to get, and the bloody things pack in! Dead as a dodo.
The rest of the journey, all I had was sodden cold hands. The blue flashy light twinkled brightly at my crotch all the way home and I grumbled at it with gritted teeth.
Back at home, the Gerbing website and FAQ blissfully ignored the possibility anything could go wrong with the gloves and the instructions that came with the gloves continued to extol their ‘Bahamas in the summertime’ levels of performance.
So all I could do was contact Gerbing directly. After finding various websites that offered startlingly little information, I eventually stumbled across the www.gerbing.eu website and put in a plea for help. And, credit where credit’s due, I got immediate contact back from Gerbing’s Director no less. He even put in a call – but failing that dropped me an email. Top marks.
What didn’t get top marks was some of the info. I got back.
Firstly, the singeing hand. It turns out it might not have been COLD ENOUGH at the time to stop the gloves cooking my hand. They apparently need enough cold air passing over the back of the hand to cool it down sufficiently. For the first ride I remember it was about 6 degrees and it turns out Gerbing don’t recommend using them above 5 degrees.
Which isn’t really what I was hoping for, or what I expected – i.e. if it’s not cold enough, they’ll burn your hands!
Onto the gloves cutting out. That turns out it was a problem with the old controller and is fixed in the new. However with a bit of pressing, asking why it cut out and what’s the reason, it turns out the blue light shows there’s not enough voltage being supplied by the bike to the controller. If it drops below 11.8v the controller cuts out and your hands get cold. All of which is fine but running a Triumph Rocket 3 without any other pulls on power than the lights and with a fresh battery that’s never caused any problem and is continually plugged into an Optimate – I’m tempted to dispute this.
However, sometimes life’s too short. Gerbing man did initially say he’d replace the controller but after subsequently working out it is in fact their latest controller, he went radio silent on that idea and I’ve not heard anything since.
So here I am with gloves that kinda work, mostly disappoint and with a feeling of a tinge of misselling. Having spent 30+ years riding bikes and freezing assorted appendages through the winter months, I’m still going to persist with heated gear (before I possibly consign it to the great dead-end in the sky along with sidewinder sidecars and Chen Shin tires) and if I get anywhere further I’ll update you here.
Suffice to say, these Gerbing gloves have been, to me, a disappointment. You might have better luck with them and in a chillier part of the world, they might be a godsend. I’m lucky enough not to have tried them out in proper sub-zero temperatures as if it’s looking likely to be really icy on the roads these days, I’ll take the car. Having said that, I’m still in the market for keeping myself warm on the bike in the winter and, fool that I am, I’ll probably be persisting. If I can make it easier to use and I can adjust my expectations away from barrels of freshly toasted kittens, maybe I’ll get there in the end!